
Wednesday, 25 June 2014
MANS CARD
This next card was made again very simply on 8 X 8 card, using a printed black checked paper as the main background paper. I then printed off the sky as the next background paper and then four images of airplanes. All these images I then matted onto Black card and used STICKLES to edge each image and dot around the checked background paper. The last thing i did was stamp a simple sentiment and cut it out, adding stickles again around the edges.

ROSES ARE RED
This card was for my Moms birthday and to be honest was really simple to make. First i started with the usual 8 X 8 card matted and layered CENTURA PEARL CARD cut using GRAND CALIDER SQUARES with the inside of the frames embossed with a smaller square die. For the aperture I used an embossed swirl CENTURA PEARL CARD and then used glossy accents over the raised swirls.
I then used roses and leaves cut out and decoupaged just using two layers. I again used GLOSSY ACCENTS over the petals and leaves, but doing a bit at a time and leaving a minor gap between each application so that the petals and leaves really felt very dimensional. I then added a golden swirl and a sentiment and finally added four large pearl flat beads to the corners.

I then used roses and leaves cut out and decoupaged just using two layers. I again used GLOSSY ACCENTS over the petals and leaves, but doing a bit at a time and leaving a minor gap between each application so that the petals and leaves really felt very dimensional. I then added a golden swirl and a sentiment and finally added four large pearl flat beads to the corners.
LAVINIA BACKING PAPER WITH STAMPED IMAGES

This is a card using the LAVINIA PAPERS, LAVINIA STAMPS AND GLOSSY ACCENTS. Framed with rectangle labels SPELLBINDERS cut and embossed, using the CENTURA PEARL card. Matted onto black card. A green fabric flower with pearlised gem is added to the corner to match the green of the paper.
Glitter was added to the glossy accents as it dries and glitter added to her acetate wings. A simple stamped sentiment added to a label was the final finishing touch.
Monday, 2 June 2014
ANDREWS 50TH BIRTHDAY
This card is very simply made using 7 x 7 inch white card with the toppers matted and layered onto CENTURA PEARL CARD again matted onto black card. The main topper and background paper were stuck down at angles to the square card to add some movement to the card.
The river was glittered and glossed with STICKLES and GLOSSY ACCENTS, plus i stickled the edges of the three round toppers and the around the oval in the picture.

The river was glittered and glossed with STICKLES and GLOSSY ACCENTS, plus i stickled the edges of the three round toppers and the around the oval in the picture.
Monday, 7 April 2014
MOTHERS DAY CARD
Making a Mother's Day Card Is hard when your Mother also makes cards herself, but I know now that the end result is just lovely and that she really liked it. It's funny watching someone inspect your card trying to see how it's made, but i also do that myself with any cards that she makes for me.
The card I usually use is an 8" x 8" card made smaller to fit the square layered backgrounds from the SQUARE SPELLBINDERS DIE. The main topper is embossed, an oval aperture cut our and pink glitter card placed behind the aperture. The Mothers Day label is again from SPELLBINDERS cut out after I had printed off the sentiment. The Flowers are from the HEARTFELT CREATIONS STAMPS AND DIE SET. I finished the card off with a beaded swirl from CREATIVE EXPRESSIONS, a beautiful button from off a market and satin ribbon on the corners also from the local market. The card used for this is the CENTURA PEARL CARD. I always use this as it gives off such a beautiful shimmer and this one has the gold shimmer, which has actually been picked up by the camera.

Saturday, 22 March 2014
ENGAGEMENT CARD
Engagement Card for Dear Friends and Neighbours of my mine.
Started by using an 8 x 8inch card and using CENTURA PEARL CARD with layers of gold card. The top is embossed using an embossing folder and then a frame topper on top of floral green paper. I used the TATTERED LACE DIE LETTERS which came with the magazine they produce and added my friends names onto the floral paper. I also used the TATTERED LACE DIES to make the floral arrangement on the side. Also adding leaves by Tattered Lace. I finished the card off with four candy dots, a congratulations label and fine gold glitter all over the flowers.
The inside of the card was matted with gold embossed card, a verse on a spellbinders label and a frame made from the same floral green paper used on the front of the card.
I forgot to take a picture of the inside of the card. Never mind. I also forgot to take a photo of the main card and had to ask my friends to take a photo of it for me and send via our phones. My mind is getting old.
Anyway i hope you like the card i have made. I love the new Tattered Lace dies. I know they cost quite alot, but they are so easy to use. I'm sure i shall use them as much as the Heartfelt Creations ones that i love too.

Saturday, 15 February 2014
VALENTINES CARD FOR MY SON
Here's an 8 inch square card made with a backing card with red hearts and gold swirls. I then added Edge Borders in Black and Gold made from the TONIC PUNCH on both edges of the card. I then used GLOSSY ACCENTS over the little red hearts on the backing card and left it to dry for an hour.
For the next step i had to make the middle panel from Red Glitter Dot Card matted onto Black Card just to give it an edge. I then hand drew a heart onto Black Card and then cut it out. I hole punched the top middle of the heart to thread some string threw and hung it from the main red satin bow, then covered the hole punch hole with a big red Gem.
I finished the card off with a sentiment from BRITANNIA DIES, A Gold Corner embellishment by CREATIVE EXPRESSIONS, which i put at the bottom of the heart, COSMIC SHIMMER BLACK GLUE dotted around the rest of the heart and the edge of the card, then finally a few strings of white pearls also from CREATIVE EXPRESSIONS.

For the next step i had to make the middle panel from Red Glitter Dot Card matted onto Black Card just to give it an edge. I then hand drew a heart onto Black Card and then cut it out. I hole punched the top middle of the heart to thread some string threw and hung it from the main red satin bow, then covered the hole punch hole with a big red Gem.
I finished the card off with a sentiment from BRITANNIA DIES, A Gold Corner embellishment by CREATIVE EXPRESSIONS, which i put at the bottom of the heart, COSMIC SHIMMER BLACK GLUE dotted around the rest of the heart and the edge of the card, then finally a few strings of white pearls also from CREATIVE EXPRESSIONS.
Tuesday, 14 January 2014
COLLECTION OF HANDMADE CHRISTMAS CARDS
Well, with the pre-Christmas i had, family and friends were lucky to get a card off me at all. It was one of my worst months ever. Anyway when i did manage to sit down and make some, I just hadn't the time to put
them on my blog at the time. So although it may seem daft putting up Christmas Cards after Christmas i still thought people might like to see them. All of them are made on 8in x 8in card, using my Spellbinders, Heartfelt Creations, Creative Expressions, Cosmic Shimmer Glues, Marianne Dies and various Christmas papers and card stock.
So here they are and i hope you like them. Just sorry I didn't manage to get them on the blog before Christmas.


So here they are and i hope you like them. Just sorry I didn't manage to get them on the blog before Christmas.


ESPECIALLY FOR YOU WITH TONIC AND SPELLBINDERS
I'm loving some of the Tonic Dies at the moment and just thought this topped off the Spellbinders Opulent Ovals Die. I also used a Spellbinders Die-lites flourish Die for the corner on top of some fancy floral paper. Then again used the Cosmic Shimmer Pink Glue to make border dots around the card. The card used is Centura Pearl, is there really anything other than Centura that gives this beautiful shimmery finish ? I then adorned the card with a bouquet of flowers. It was made for my friends birthday and took most of the day to make and dry.
So here's the finished card;

So here's the finished card;

Monday, 13 January 2014
MY CARD FOR 65TH BIRTHDAY TO MY STEP DAD.
Well i haven't posted for quite a while, not that i haven't been crafting, just that with Looking after my mom, going away for Christmas, breaking down, expense of car repairs and so much more I just haven't seem to have found time to actually sit down and download pics of my crafting.
This card is obviously for a special 65th Birthday for my Step Dad. It's a easel card but I'm really happy with the the way the 6 and the 5 intertwine nicely and of the card stock used.
He was really happy and said the words a crafter longs to hear "Wow that's a lovely card, one to keep and treasure" To hear that, you know all the time taken on a card was worth every second. I'd hate to think our hand crafted cards were just thrown away with all the others.
Anyway here it is and i hope you all like it too.

This card is obviously for a special 65th Birthday for my Step Dad. It's a easel card but I'm really happy with the the way the 6 and the 5 intertwine nicely and of the card stock used.
He was really happy and said the words a crafter longs to hear "Wow that's a lovely card, one to keep and treasure" To hear that, you know all the time taken on a card was worth every second. I'd hate to think our hand crafted cards were just thrown away with all the others.
Anyway here it is and i hope you all like it too.

Sunday, 3 November 2013
GET WELL SOON CARD FOR MY MOM
Wow this is probably the most important card I've ever made. I just wanted it to be so good. My mom is going into Hospital tomorrow to have a Hip Replacment. I know there's nothing to worry about. Thousands are done every year etc... But it's my mom and I've been through so much pain in my life and I hate to see other people suffer from pain too.
So I made this card for her using Marianne Dies, Heart Felt Creations Dies and Stamp for the Flower, Centura Pearl Paper and Card, a sentiment topper that I've had for years in a drawer, so I'm not sure who made that. The Leaves are also from fake flowers and leaves that i buy randomly when ever I see any. And I then went mad with the Cosmic Shimmer PVA Glue pearl dots around the card. Maybe a couple too many I think. For the inside I printed a simple message on Centura Pearl Paper then cut it out using a Tonic Die, and for the leaf corner embellishments i used one of the Spellbinders Die-lites Die Fantastic Flourish Two.
Here's the card;


So I made this card for her using Marianne Dies, Heart Felt Creations Dies and Stamp for the Flower, Centura Pearl Paper and Card, a sentiment topper that I've had for years in a drawer, so I'm not sure who made that. The Leaves are also from fake flowers and leaves that i buy randomly when ever I see any. And I then went mad with the Cosmic Shimmer PVA Glue pearl dots around the card. Maybe a couple too many I think. For the inside I printed a simple message on Centura Pearl Paper then cut it out using a Tonic Die, and for the leaf corner embellishments i used one of the Spellbinders Die-lites Die Fantastic Flourish Two.
Here's the card;


ANNIVERSARY CARD FOR MY DEAR FRIENDS.
I've not been crafting for a while. Sometimes when I have no birthdays or occasions to make cards for I take a break from it. I don't sell any of my crafts. I don't think anyone would buy them, and they cost far more to make than I would get if i sold them. I do the cards for family and friends and the other crafts for me, family or friends. Having comments from followers is wonderful and It gives my confidence a real boost when someone says how lovely a project is that I've made.
Anyway here's an Anniversary Card I have made for my Dear friends. It's nearly all Centura Pearl Paper and Card, Spellbinders Dies, Sentiment Dies by Britannia Dies and Heartfelt Creations dies and Stamp set with a few Flowers and Gems. Oh and the Sue Wilson Technique of doing Pearls around the card using Cosmic Shimmer PVA Glue in Cosmic Pearl.

Anyway here's an Anniversary Card I have made for my Dear friends. It's nearly all Centura Pearl Paper and Card, Spellbinders Dies, Sentiment Dies by Britannia Dies and Heartfelt Creations dies and Stamp set with a few Flowers and Gems. Oh and the Sue Wilson Technique of doing Pearls around the card using Cosmic Shimmer PVA Glue in Cosmic Pearl.

Sunday, 1 September 2013
LEAFY TREE HANDMADE CARD
Autumn will soon be here and my Nephew has an Autumn Birthday so I thought about using one of my new SWEET POPPY STENCILS and using INDIGOBLU FLITTER GLU with their YORKSHIRE DALES GILDING FLAKES onto Black Card. I also heat embossed "Birthday Wishes" with COSMIC SHIMMER LAPIS BLACK AUROURA EMBOSSING POWDER onto the black card. I then matted the card onto Gold Mirror Board.
The background card is a mirror board from CARLEY at CREATA and was embossed by using one of SHEENA DOUGLAS LEAF EMBOSSING FOLDERS. Then with one of the leaves I added RANGER ADIRONDACK colour GOLD ALCOHOL INK and outlined this leaf with STICKLES colour PATINA. To finish the card off I matted all of this onto another piece of Gold Mirror Board and edged this with a TONIC PUNCH and added a few black and green gems and a gold bow with a button. The finished card is an 8 inch square white card.
Sometimes I don't know what size of card I'm going to make and just start of at making the Topper first, then simply just matting and layering until I'm happy. I then add all this to a card I have in my stash, sometimes having to cut a card down to size, or even make one from scratch. I find it easier to make the Toppers first, than stare at a blank white card and wonder where to begin and what with.
I hope you like it. The photo doesn't do the gilding flakes justice. They are actually greens and golds and very light reflective, but not on this photo I'm afraid.

The background card is a mirror board from CARLEY at CREATA and was embossed by using one of SHEENA DOUGLAS LEAF EMBOSSING FOLDERS. Then with one of the leaves I added RANGER ADIRONDACK colour GOLD ALCOHOL INK and outlined this leaf with STICKLES colour PATINA. To finish the card off I matted all of this onto another piece of Gold Mirror Board and edged this with a TONIC PUNCH and added a few black and green gems and a gold bow with a button. The finished card is an 8 inch square white card.
Sometimes I don't know what size of card I'm going to make and just start of at making the Topper first, then simply just matting and layering until I'm happy. I then add all this to a card I have in my stash, sometimes having to cut a card down to size, or even make one from scratch. I find it easier to make the Toppers first, than stare at a blank white card and wonder where to begin and what with.
I hope you like it. The photo doesn't do the gilding flakes justice. They are actually greens and golds and very light reflective, but not on this photo I'm afraid.

Friday, 9 August 2013
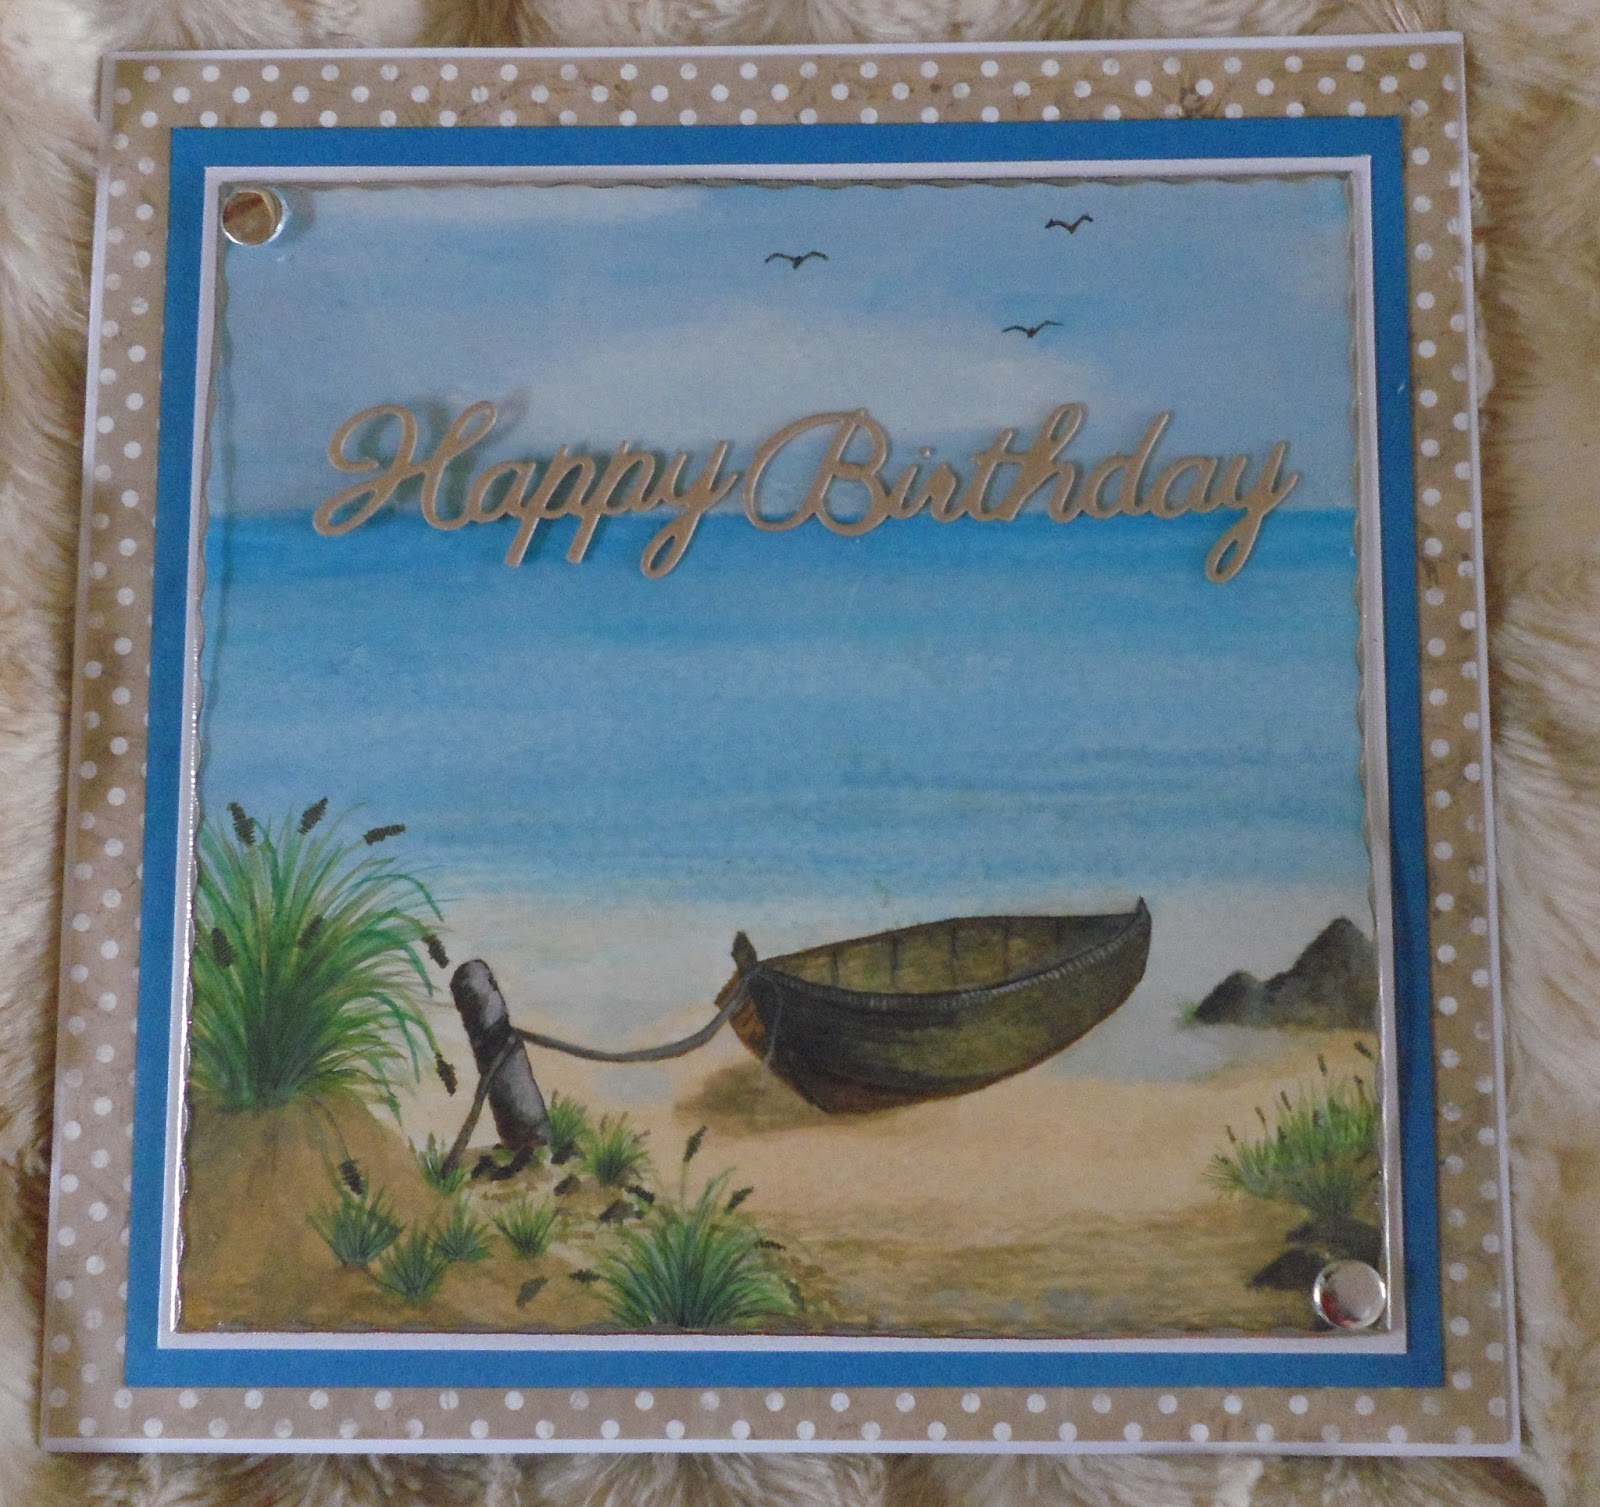
WATERCOLOUR SCENE FOR MY DADS BIRTHDAY
Well it's my dad's Birthday soon and he lives in Spain now, but he used to love our own coastline, especially Cornwall and i think this picture I've painted reflects our coastline. I'ts painted in Watercolours on watercolour paper and just matted and layered onto 8 x 8 card. Then added a Happy Birthday die cut from BRITANNIA DIES by JOANNA SHEEEN. It's one of the simpler cards I have made. I love to paint but haven't done it in ages. I'm definitely out of practice. Hoping my dad won't see the errors.
So here's the card.

So here's the card.
Wednesday, 7 August 2013
SHIMMERING BUTTERFLIES

I love making tags. They are obviously bigger than ATCs and so can take much more detail. I hate being restricted by the size of an ATC. With this tag, the background is just a mixture of watered down acrylic paints, then I added some COSMIC SHIMMER SPARKLE PAINT in ANGEL GOLD and just splatted dots all over the tag to add some shimmer. I then used SHEENA DOUGLAS DISTRESS STAMPS for embossing around the edge of the tag. I love this stamp and has become one of my most used stamps. To add some detail to the tag I wanted a delicate floral background and used a stamp that i have no idea where i got it from. Sorry. I then embossed the stamps using PERFECT MEDIUM and COSMIC SHIMMER in LAVA BLACK AURORA. The butterflies are from SHEENA DOUGLAS and embossed with COSMIC SHIMMER in VIOLA BLACK AURORA. I painted the butterflies using SHEENA DOUGLAS H2Os in various colours to match the tag. I finished the tag off with a sentiment on a die cut, added some STICKLES GLITTER GLUE to highlight some of the flowers and butterflies then tied various scraps of ribbon to the tag.

Here's the same tag but taken in a different light and totally shimmers in a completely different way.
Also the photo shows just how dimensional it is.
I absolutely love it and shall add some distress ink to the reverse and then leave a clear space for a message for someones birthday. Trouble is i hate giving them away, but happy to know that when i do give them away, they are usually kept by the receiver and that means the world to me.
Having someone say they are going to keep your work is just simply the biggest compliment anyone can get.
Tuesday, 6 August 2013
TO ADD A BOW OR NOT TO ADD A BOW THAT IS THE QUESTION.
Is a bow too girly? This card is for my son and has been made by using a DARICE circles embossing folder on black card and repeating it trying not to have a visible line. But this folder does not repeat match so a line was inevitable. I then used COSMIC SHIMMER GILDING WAX and rubbed this all over the card. So to hide the line I used an EK SUCCESS BORDER PUNCH on tan paper and then on white paper. I also added die cut shapes to to add a "Happy Birthday" sentiment die cut using the BRITANNIA DIES from Joanna Sheen. I matted and layered the card, then added stickles glitter to the inside of the embossed circles, but then came the question. Do I add a bow? The card just looked a bit bare even with four pearl adhesive gems in the corners. I tied the bow and placed it over the tonic border and it seemed to go really well, but is it too girly to add a bow to a mans card? I haven't yet added an insert to the card just in case I decide to change my mind and make something else. I'm hoping maybe some advice from readers may help me.
Here's the card. Would a guy find it too girly?

Here's the card. Would a guy find it too girly?

HAVEN'T BLOGGED FOR OVER A MONTH
Wow it's been ages since I've sat down to craft. The weather was just too hot to sit inside. I'm such a sun lover so when ever the sun is out I'm out. Was very tempted to buy a paddling pool to cool off. I haven't even been bothered to do much in the garden this year either because of the heat and I love gardening. Mind you, losing four trees over the winter storms has made me very sad and my garden just doesn't look the same anymore. I have replaced two of the trees but it's amazing how bare it now looks. Anyway, i may not have been crafting much but i have been adding more crafty items to my stash. So I have lots of new things to play with. Another reason I haven't crafted much is because I still haven't moved from downstairs where i have no room to spread out, to my spare room which I'm trying to get set up as a craft room. Takes money though and at the moment I'm not in a position to go spending lots on new furniture. Although I have to admit, as my son pointed out, that if I stopped the crafty spending then my craft room would be furnished much quicker. Proof positive my son is no longer a child anymore. Infact he's 19 this month hence the reason to get back making things again.
Saturday, 22 June 2013
KNOCKED BACK AND GUTTED
I recently applied to be a member of a design team for a lady who really inspires me to craft, and still will even though I wasn't selected when 6 ladies were chosen. My first thoughts were that my crafting just wasn't any good, and that I had been silly to think that I had any talent. I'm just so critical of myself. And knowing that I didn't even make the top 6 really hurts.
Now to positive thinking. Pick myself up and just forget that I put myself out there and just carry on doing what I'm doing for the love of doing it.
Here's the three designs I put forward. I thought they were a good representation of a varied selection for the Lady who required new DT members. Obviously they weren't, but at least they didn't go to waste because the card was for my Brother in law who loved it. The Frame was for my bedroom and I love it, and the scrapbook page is for my own scrapbook that I'm making slowly around other things.


Now to positive thinking. Pick myself up and just forget that I put myself out there and just carry on doing what I'm doing for the love of doing it.
Here's the three designs I put forward. I thought they were a good representation of a varied selection for the Lady who required new DT members. Obviously they weren't, but at least they didn't go to waste because the card was for my Brother in law who loved it. The Frame was for my bedroom and I love it, and the scrapbook page is for my own scrapbook that I'm making slowly around other things.


Thursday, 20 June 2013
HEART OF FLOWERS

Tuesday, 18 June 2013
MISS YOU CARD
I love this card I've made today. A friend of mine is having so many health problems which has meant that we haven't been able to get together to sort the world to rights very much. So I thought this card might cheer her up and remind her that I'm still here for her whenever she's ready for visitors again.
 The card is an orange linen effect card with a super smooth white card which I've embossed and tinted with Spiced Marmalade Distress Ink. I've then added some lace flowers, die cut a beautiful Marianne Die and Stamped eight different sized Sheena Douglass Flowers and layered them onto some die cut leaf sprigs. The flowers are painted in Sheena's Radiant Rain and H2O paints so have a beautiful sheen to them, which sadly again the photo does not do it justice. Although I think thats my photography skills to blame. To finish the card I've added a Miss You label and large gem stones to the center of the flowers. I think it's a real cheerful card and I hope it makes my dear friend feel more cheerful too.

Subscribe to:
Posts (Atom)